Soldering tips for Kinman pickups
www.kinman.com Aug-2006 © Chris Kinman
In August 2006 we began the transition to RoHS compliance, that is our
products are manufactured without Lead to comply to the new RoHS 'Lead
Free' international standards. All products will be Lead Free by end of
2006. You will see this symbol printed on the back of the pickups or
harness parts.
Lead Free products use SAC solder (Silver and Tin) and are soldered at a
temperature of 700 degrees F. NEVER mix Lead solder and Lead Free
solder. If a lead free product is repaired and re-soldered with leaded solder then long term
reliability can not be assured.
It is possible to avoid soldering altogether by ordering a Kinman NoSoldering Harness. However,
fitting Kinman pickups is not so difficult. The only tricky part is soldering. Our cable tips are
compatible with Lead and Lead Free solders. First you need a 25 - 40W watt pencil type
soldering iron to perform good soldering work on pot casings because these dissipate lots of heat
energy. You also need a small roll of resin cored solder preferably between 1 and 1.7mm in
diameter.
Now let me show you the tricks that makes it easy. Look at the photo of the pickup cable. Notice
the RED end, this is soldered to the switch terminals, this part is pretty easy. Apply the tip of the Soldering iron to the terminal and melt whatever solder remains from the original installation,
apply a little more solder if necessary. Poke the exposed wire of the Red end into the opening in
(or over) the terminal, hold for a second or two and then withdraw the Soldering iron. Hold the
cable steady in place for a few seconds while the solder cools and solidifies.
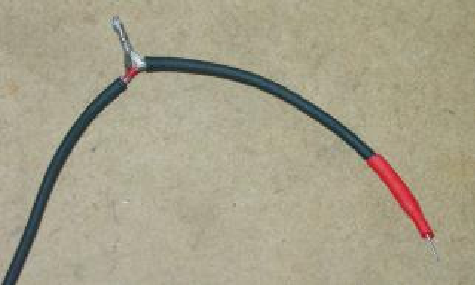
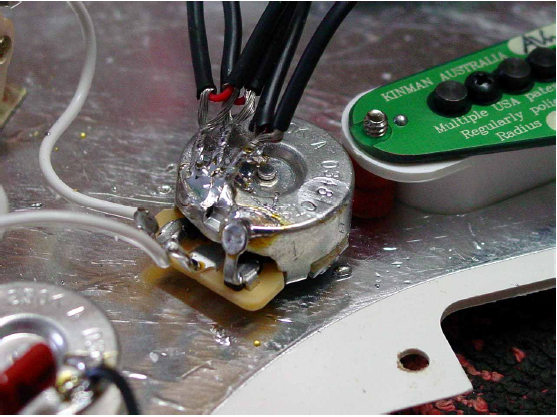
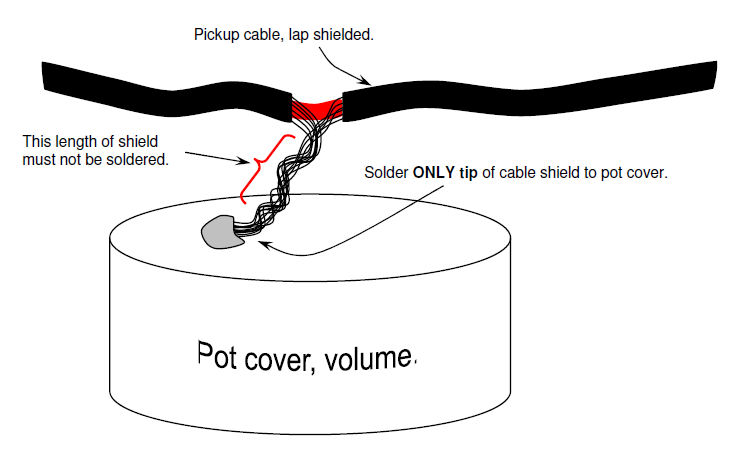
Back from the end of the cable is the ground take-out point that I call the *ground-leg*, this is the most difficult part to solder. The correct way to solder this to the back of the volume pot is to first apply heat from the soldering iron to the case of the pot, adding a little bit of solder helps heat transfer. It's getting ready for the next step when you notice the solder take to the metal of the pot case. Some pots have a shiny yellowish plating that will not take solder. This coating should be scraped or abraded (sanded) off to expose the metal of the casing which will take solder more easily.
Once you have a little pool of molten solder on the pot case simply poke the tip of the ground-leg into that pool, don't try to lay the whole length of the *ground-leg* into the solder. Once the tip had taken to the pool of solder remove the iron and let it cool. The reason for soldering only the tip is to prevent heat conducting along the ground leg and melting the Red inner and causing a short.
If this happens it is possible to open the lap shield to expose the Red inner with a pointed object like a small knitting needle. By so doing it is likely you will solve the short when you pull the strands of the shield away from the Red inner. A little drop of super glue of Nail laquer over the melted point will prevent the short recurring.
In any case it might be reassuring to have someone who has soldering skills available for help should you run into difficulty, or avoid soldering altogether by ordering a Kinman NoSoldering Harness.
Good luck.
This page has been intended only to be guide, if you get into difficulty I suggest you consult a high quality, extremely competent repairman with a lot of experience. There are a lot more complications and finer points not discussed here as a small book could be written on the subject. Have fun, stay cool and don't smash your guitar (in frustration). Hope you like all this stuff.
Regards, Chris Kinman