NOTE: This info is copyright and must not be used for commercial purposes by any other party. Chris Kinman (c) 1998
We lead in No-Hum pickup technology today ... others will try to catch up tomorrow. Who are you going to follow? the innovator or the imitator?
The following information is not intended to alleviate the need for you to become friends with a high quality guitar repairman and have him perform his magic on your guitar occasionally. All guitar players can benefit from consulting a high quality and knowledgeable repairer so don't skimp, it can be money well spent. Beware of pretenders though, repairers in the quality catagory are relatively hard to find. Check your prospective out thoroughly. The last thing you want is for some Axe murderer messing with your trusty guitar.
Now, how to adjust your Kinman pickups to get the sounds you've always wanted, and more....
Be aware that your cable can make or break your sound. To get the best from your Kinman pickups you need a low capacitance cable. The Klotz vintage 59 is the best one but some others work pretty well too. See the list, navigate to Blogs > Any old cable won't do
Pickup adjustment
Neck adjustment
String height adjustment
Intonation adjustment
String choice
Before I get into this I want you to understand that the value of the volume pot is crucial for performance. Please check it as described on the Perfect Guitar page > Pot values . The following may be a waste of time if the volume pot value is not right.

The two best tone controls you could wish for, nasty to sweet in 2 turns (and much more in 3 turns).
Before you begin it's a good idea to start with a clean slate. Don't try to adjust your new Kinman pickups using your previous amp Eq settings. I suggest you set the tone controls to 12 o'clock (position 5 on the knobs) and dial the adjustments in from there, adjusting the Eq controls only after you get the best result from the pickups. The amp controls will then just fine tune the basic correct pickup adjustments. Don't be afraid to use the controls, that's what they are there for. If your sound needs more brightness simply turn the treble control up.
You can explore from a low pickup height setting with a high volume amp setting OR with the pickups at maximum height with lower volume amp settings. Some players prefer one or the other and some prefer inbetween so PLEASE experiment and try both approaches.
Beginning with Maximum height:
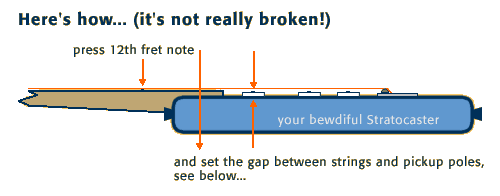
With both E strings pressed to the 15th fret ....
Set the gap at the neck pickup (both E strings only) to 2mm or 5/64", but not less than that.
Set the gap at the middle pickup (both E strings only) to 2mm or 5/64", but not less than 1.75mm or 1/16"+.
Set the gap at the bridge pickup (both E strings only) to 1.5mm or 1/16", but not less than that.
To get a workable volume balance between the neck and bridge pickups I suggest you adjust the bridge pickup to your desired sound. Then adjust the neck pickup so it balances. Occasionally we have to put up with a little bit of imbalance to get the sound we want from each pickup, this is normal.
Beginning with Minimum height:
Set the pickups almost level with the pickguard and raise a little at a time until you discover where your sweet spot is. Take care not to let the pickup drop off the end of the screw. If this happens the only way to get the screw started again is to take the pickguard off.
Tilting the pickup: Adjusting the pickup closer to the plain strings will accent the treble in the sound. Adjusting the pickup closer to the wound strings will accent the bass in the sound.
NOTE: If you use less than the recommended gap measurement the sound might be abrasive and harsh and we wouldn't want that now would we, or would we? ALSO these gap distances assume the vibe arm is depressed and not raised. If you pull up on the arm you'll need to increase the gaps accordingly or else the strings will bottom onto the magnets and cause a terrible crashing sound through your amplifier. It's simple to do a test by pulling up on the arm and observe the proximity of strings to magnets.
Increasing the gap will reduce output level and brightness, some people will like that but others won't, so experiment to get the effect you want. Remember that even 1/4 turn of the adjusting screws can make the difference. And don't be afraid to lower the pickups almost to the pickguard and turn the amp volume up.
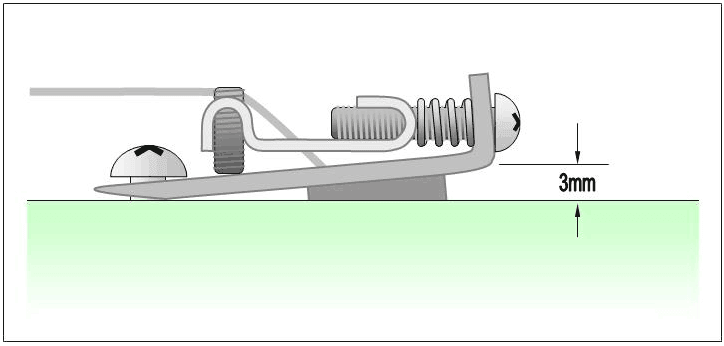
You can do things like optimize the neck pickup for loud lead work, the middle for softer rhythm and the bridge for bright twang, bite and growl, or any other responses you would like. Another nice rhythm sound can be achieved by setting the neck pickup down more on the bass side (3mm) than the treble (2.5mm). The in-between sound (2 pickups on simultaneously) can be varied to a surprising degree. For maximum hollowness in pos 2 or 4, set the pickups as above, but for more quack/bite adjust the middle pickup away from the strings. You make the rules here, so experiment!!!
Kinman pickup adjusting screws are the two best tone controls you could wish for, and so much better than relying on the volume or tone controls to dial-in your sound.
My pickups are more responsive than any other pickup to these settings and a wide variety of tonalities can be achieved by messing around with them. Spend a little time exploring this whole new world of tone and dialing in your sounds one pickup at a time, the effort will be well worth while. And don't be discouraged if it takes some time, I've heard of players finally achieving their goals up to 2 or 3 weeks on. One customer even took his pickups out and put them in a drawer for 3 years believing the pickups could not deliver his preferred sound. However after 3 years he re-installed them and spent a few days messing around with adjustment and to his astonishment he discovered his perfect sound that put him is tone heaven. Now he says there is no way he's taking them out again. Learn from his experience.
STRAT-ITIS explained (Strat-itis = simultaneous multiple discordant frequency syndrome).
Dirty or rusty strings can also do this but many players know this horrible phenomena is caused by excessively strong magnets in the pickups, here's how it works. What happens is the magnets of the pickups pull on a section of the string (the part that's over the pickups) into a U shaped vibration path. Normally the strings vibrate in what is essentially a single-plane path or pattern that is more or less straight (not U shaped). Lets say that the time taken for a string (not subjected to excessive magnet pull) to complete one cycle or oscillation is X milliseconds (this is the pitch of the note). Traveling in a U shaped path it actually takes longer to complete one cycle or oscillation since the distance is greater via the U shaped path, so the time is X + Y milliseconds. Now it's getting clear that what you have is a string that has a section of it's length vibrating in a U shaped path and part of the remaining section traveling in a straight single-plane path and yet other sections traveling at all frequencies between these two extremes. This means that the three sections are actually vibrating at many different frequencies when the string should be vibrating uniformly at a single frequency. What happens when you mix all these different frequencies together? Uggghhh, dissonant Strat-itis that's what! It's bad enough hearing 2 non-harmonious notes coming from a single string, but when you get multiple dissonant frequencies (or notes) being produced simultaneously from a single string the results are absolutely ghastly. A string that's out of tune with itself no less. That's what Strats do when you adjust the pickup magnets close to the strings. But when you adjust them to prevent Strat-itis, output, sensitivity and dynamic range are reduced and noise is increased when the Amp's Volume is turned up to compensate.
Fortunately Kinman Strat* and Tele*pickups utilize a unique magnet technology that reduces the string pull of Alnico-5 by around 35% and virtually eliminates the multiple note syndrome in Stratocasters. This is not magnet aging or degaussing, this is something new, something unique to Kinman.
Checking the truss rod adjustment.
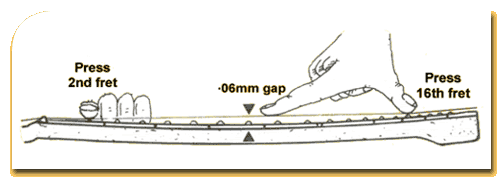
1. The neck should be almost straight when the guitar is in tune. You can check this in two ways. With the guitar in a playing position (important), first eyeball along the edge of the fretboard, this will give you an indication of any massive discrepancies, such as a banana bend or a kink. Next, hold (in turn) each of the two E strings down at the 2nd fret and the 16th fret and note the gap between the string and the crown of the frets (see fig 2). A gap of about .06mm or .003" (the thickness of a piece of paper) is ideal but it can be a little more. If this measurement is excessive then adjust the truss rod until at least one side is straight (due to twists it is permissible for one side to be a little more bent). Don't over straighten either side and remember to readjust the truss rod if you change string gauges or switch between different brands, such as D'Addario and DR which have different tensions.
Checking the string set-up:
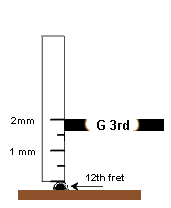
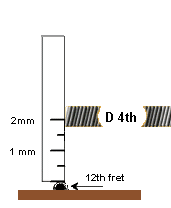
2. Next you have to check the string heights above the frets. Measure the gap at the 12th fret between the string and the crown of the fret with the note on the 1st fret closed. For a .009"-.046" gauge the E1st string should measure no less than 1.2mm (3/64") and the E6th no less than 2mm (5/64") but 2.1mm is better. The intermediate strings should increase gradually to bridge the two E strings. Because the bass strings have more excursion than the thinner ones their gap has to be more, to prevent unwanted rattle or clunk (that's when the string hits the fret so hard it actually discharges most of it's energy with a 'thunk' sound). This is deceiving because it continues to vibrate, but without the bass frequencies and with much less output. Don't be fooled into thinking the action is really great (low) and it doesn't rattle; it's just that it's gone through the 'threshold of rattling' into the clunk zone and you're loosing more than half of your tone and output level. Get used to having the action higher, it will only take a week and your sound will be so much better.
Set the following gaps at the 12th fret with the first fret closed. These measurements suit .009"-.046 gauge strings, for heavier gauges you can reduce the gap slightly but for lighter gauges I recommend that you increase the gaps slightly. If the string bends choke in the upper register it probably means there is an End-kink in the neck at about the 15th fret. This is a very common problem with guitar necks. The simplest way to overcome this is to raise the action height until the bends don't choke, alternatively you can have the fretboard relevelled and refretted (ouch!) by a high class guitar repairer. Don't even think about getting it done by anyone less.


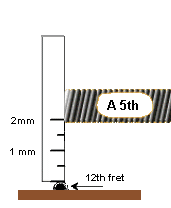
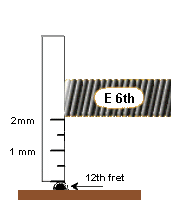
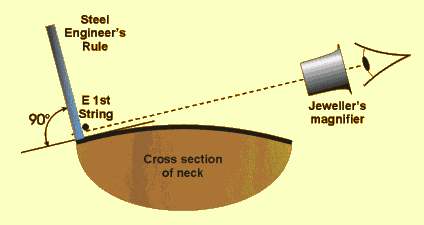
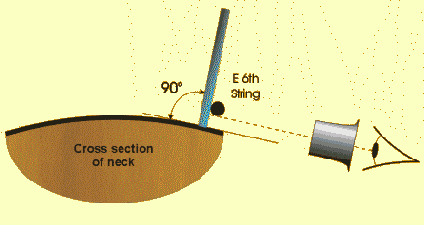
Keep the ruler at right angles to the fret over which you are setting the string gap at.
IMPORTANT: Use a jeweler's magnifier to see the graduations on the ruler in detail.
INTONATION adjustment:
After you have done all this stuff take a look at the intonation of the strings. Ideally, you need a tuning meter to do this accurately, and make sure the strings are in good condition. During use, strings accumulate dirt, grime and rust on the bottom side where it can't be seen easily so lift the string and gently run your finger under the string in the area you play on; it should be smooth. If they are rough or less than smooth, the strings can't possibly play in tune so replace them. Then tune the open string to zero on the meter scale and then play the 12th fret, the meter should read zero again. If it reads sharp then adjust the saddle away from the 12th fret and keep checking and adjusting until it reads zero for both tests. If it reads flat then adjust the saddle toward the 12th fret and keep going as previous until it is corrected. Work your way through all the strings one by one.
NOTE: Moving the saddles significantly can cause the bridge angle to rise or fall causing the action height to change and the strings to lose tune; the vibrato springs have to be adjusted to reset it. This whole operation is a bit like a dog chasing it's tail so you have to persevere before things come good, but once it stabilizes then it's good forever
String choice.
I recommend you don't use extra lite strings and even 009" ~ 042" might be too lite. For me personally 010" ~ 046" is the best all round gauge. Remember that SRV used .013" to .058" (Detuned to Eb); He didn't struggle with heavy strings like that for nothing. Excessively thin strings produce more squawk and less output and in general sound pretty terrible. A good compromise between heavy and light and my personal favorite set is the .010 - .046. These are easy to bend on the plain non-wound strings but have a nice full bass sound with lots of tone, twang and output from the three wounds. Remember that if you change gauges of strings the set-up will have to be revised as the neck and bridge adjustments rely on a given string tension, if that changes then so do the adjustments. As for brands, it's a personal choice as some strings don't like the chemistry of some players and won't last more than a few hours. Try different brands until you find the one that works for you.
Good luck
This page has been intended only to be guide, if you get into difficulty I suggest you consult a high quality, extremely competent repairman with a lot of experience. There are a lot more complications and finer points not discussed here as a small book could be written on the subject. Have fun, stay cool and don't smash your guitar (in frustration). Hope you like all this stuff.
All my best in Sound,

Chris Kinman.